The basic principle when using profile boards is to place a series of level boards that show the exact level 1 metre above the completed construction levels. With practice, this method provides a simple but sound method, providing adequate precision and finally delivers the required quality standards for the completed road construction works.
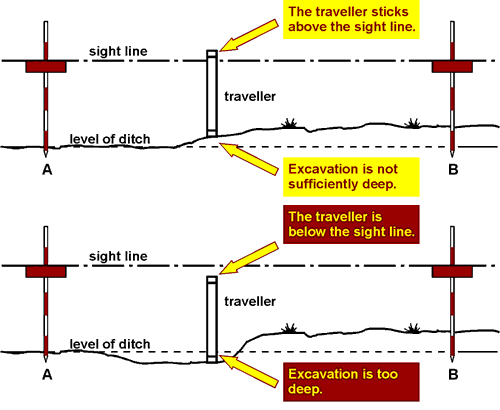
The method is best described by imagining the excavation of a ditch from point A to point B at the level of the dotted line as shown in the figure below.


The
Traveller
 A
third profile board with a fixed height is useful for controlling excavated
levels between the adjustable profile boards. It is known as the travelling
profile or traveller. During excavation along the line, from points
A to B, the traveller can be used to control that the correct levels have
been achieved. By placing the traveller in the sight line between A and
B, it is easy to determine whether the excavation has been carried out
to correct levels. If the top of the traveller is below the sight line
between the two fixed profile boards, the ditch has been excavated to
a too low level. If the traveller sticks up above the sight line the ditch
needs to be dug deeper.
A
third profile board with a fixed height is useful for controlling excavated
levels between the adjustable profile boards. It is known as the travelling
profile or traveller. During excavation along the line, from points
A to B, the traveller can be used to control that the correct levels have
been achieved. By placing the traveller in the sight line between A and
B, it is easy to determine whether the excavation has been carried out
to correct levels. If the top of the traveller is below the sight line
between the two fixed profile boards, the ditch has been excavated to
a too low level. If the traveller sticks up above the sight line the ditch
needs to be dug deeper.


 The
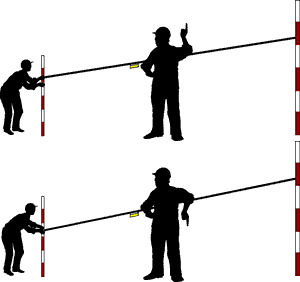
level of each of the profile boards can be controlled by using a line level.
The line level is a short spirit level, (about 100 mm long) with a hook
at each end to hang it from a nylon string.
The
level of each of the profile boards can be controlled by using a line level.
The line level is a short spirit level, (about 100 mm long) with a hook
at each end to hang it from a nylon string. This
instrument needs two persons to operate - one at the end of the line and
the second to watch the spirit level. The line operator moves the string
up or down until the bubble is centred in the middle between the spirit
level marks. The string line will then indicate a horisontal line.
 - transfer the exact level of one profile board to another, thereby ensuring that both profiles are at the same level,
- measure up or down from the horiontal level shown, and set another profile board so that there is a certain difference of level between the two profiles, and
- measure the slope between two fixed profile boards, and determine which one is higher.

- The string should preferably be of thin nylon fishing line, allowing for the line level to easily slide along the string,
- the line must be placed half-way between the two ranging rods - use a measuring tape to establish the exact middle point,
- keep the string tight - do not let it sag,
- the line level is a delicate instrument, look after it - do not throw it around and treat it roughly, and
- check the accuracy of the line level regularly.